Deploy a webapp with database connectivity on AWS EKS

EKS- Elastic Kubernetes Service
It is one service in AWS that will provide kubernetes cluster as a service.
Although we can create our own multinode kubernetes cluster but if our intention is to deploy a application on one of slave then why to spent on setting up the infrastructure for kubernetes cluster.
we can use EKS for this.
In EKS it will take care of the master node(All the services that are running inside it), how much resources assigning it that’s why AWS charge for EKS
$0.01 for EKS/hour
In EKS we have to tell only our slave node instace type.
NodeGroup
Suppose if we want 3 slave/worker nodes in which we want two worker nodes run with instance type t2.micro and one run with t2.small so we can create groups for the nodes that are known as NodeGroup.
In NodeGroup we can tell how many nodes we want that are running with same instance type.
Connect to AWS-
we can connect to AWS via 3 ways
- webui
- CLI
- API (Terraform)
For using EKS we can connect through these 3 ways but in industry we generally use CLI.
we can connect or use EKS through CLI from 2 ways
- aws eks
From this command we can use EKS for launching kubernetes cluster but from this command we can’t achieve customization.
Customization-
Customization means how many nodegroup we want for slave. In nodegroup how many node we want(which instance type we want for node group)
2. eksctl
It is one command from which we can connect to EKS through CLI and can also achieve customization.. So we use eksctl to connect to EKS through CLI.
Settings required before connecting to EKS through CLI
- Create one IAM user in as account with power “Admin “access.

2. Download aws cli
After download it login to aws account by cli

3. Download eksctl

4. Download Kubectl
we also require kubectl because it is the one from which client can connect to kubernetes cluster(master) .
After this setup we have to put the kubectl,eksctl inside one folder

Edit the Env variable . give path where kubectl&eksctl both are present.

Now start creating cluster by using eksctl
eksctl create cluster -f “filename”
In cluster file we have to write how many node groups and node we want of which instance type.


we can also check from webui that cluster is start creating

EKS contacting to cloud formation for setting up the stacks because for setting up cluster
CloudFormation connect to EC2 for launching nodes/instances.
CloudFormation connect to EBS for the storage/volume of these instances.

Now our cluster is created successfully. we can check it through eksctl
we can also check how many nodegroup are in this cluster

NOTE-
kubectl require one config file for connecting to this kubernetes cluster . This file will be provided by EKS because we setup our kubernetes cluster there.
Here i am creating/updating the config file.

This cluster have total 8 nodes running , we can also check from webui

HELM
Like in linux we use yum to install packages for a application. In kubernetes we use HELM to install the packages. In kubernetes packages is known as charts.
Client-HELM
we run HELM command for installing the packages so Helm act as client side for installing the packages from a location where packages are present.
Server-Triller
From where HELM is downloading/installing the charts/packages is server side that is known as “Tiller”
For this we have to download Helm and Tiller both for installing the packages.
After downloading put in same folder in which we have put kubectl and eksctl

For setting up the HELM we have to run following commands-
helm init
helm repo add stable https://kubernetes-charts.storage.googleapis.com/
helm repo list
helm repo update

For setting up the Tiller we have to run following commands-
kubectl -n kube-system create serviceaccount tiller
kubectl create clusterrolebinding tiller — clusterrole cluster-admin — serviceaccount=kube-system:tiller
helm init — service-account tiller
kubectl get pods — namespace kube-system

Now our intention is to install packages of Prometheus . so for this we are using Helm.
we have to run following command , this will download the prometheus in kubernetes cluster.
kubectl create namespace prometheus
helm install stable/prometheus — namespace prometheus — set alertmanager.persistentVolume.storageClass=”gp2" — set server.persistentVolume.storageClass=”gp2"
kubectl get svc -n prometheus
kubectl -n prometheus port-forward svc/flailing-buffalo-prometheus-server 8888:80

After run the last command it will give one IP. by using this IP we can connect to prometheus server running on top of kubernetes cluster

Here is our Prometheus is running.

Now we want that Grafana use the Prometheus Timeseries database for analyzing and visulaizing the condition of the nodes . Prometheus collect the real time data of the nodes/instances of cluster .
For Setting up Grafana we have to install the packages through Helm
Run following command for installing the packages of Grafana by HELM.
kubectl create namespace grafana
helm install stable/grafana — namespace grafana — set persistence.storageClassName=”gp2" — set adminPassword=’redhat’ — set service.type=LoadBalancer


After this we can connect to Grafana portal . In grafana portal we have to add our database type. our database is prometheus and give IPof the prometheus server where it is running.

we can create a dashboard in Grafana for visuailzation. We can also import dashboard for grafana. This grafana having their database type is Prometheus and running over Kubernetes cluster. So we have to import the Dashboard with all these specification. The dashboard we have to import is -

we have to give the id of this dashboard — 10000

type of database

Our Dashborad is ready. It will monitor all the nodes that are on kubernetes cluster. monitor their workload.

Part -2
Now our intention is to create one wordpress php website. Creating one Mysql database for storing the data of the wordpress.
- Creating one service type LoadBalancer for Wordpress so that client can connect to the site. Creating one PVC that will mount the /var/www/html folder of wordpress. This PVC will contact to PV and pv to storage class. Storage class can get the storage from EFS .
If SC getting the data from EBS that means creating one hard disk but we can only mount this hard disk in a case when EBS volume region and wordpress pod region are same . so it is better to use EFS instead of EBS. and also we can mount EFS vol to multiple pods at a time that can’ be done by EFS.
2. Creating one service type CLusterIP for MYSQL database so that it doesn’t have outside connectivity. Creating one PVC taht will mount the /var/lib/mysql folder of MYSQL . This PVC will contact to PV , PV to SC and SC get the data from EFS.
So lets first create storage in EFS.

In vpc we have to put same VPC — that is used by nodes so that EFS will be able to join to pod running over nodes.
In security group we have to provide same security group that is used by nodes.


Creating one seperate namespace for this project.

Now we have to install one utility “amazon-efs-utils” in all the worker nodes/instances. Because wordpress pod and Mysql pod that will run over these nodes demand for EFS storage and It will work only when this utility will be avalilable in the nodes. we don’t know on which instance pod gonna launch so better to install utility in all instances.
Installing amazon-efs-utils in 1st worker node.

Installing amazon-efs-utils in 2nd worker node.

Installing amazon-efs-utils in 3rdworker node.

Installing amazon-efs-utils in 4th worker node.

Installing amazon-efs-utils in 5th worker node.

Installing amazon-efs-utils in 6th worker node.

Installing amazon-efs-utils in 7th worker node.

Installing amazon-efs-utils in 8th worker node.

Now we have to put the EFS dns name and file system id that we have created into the efs-provisioner file.

we have created this file so that kubectl can access the EFS that is running on cloud

we have also create one file “rbac.yaml” that will provide Role access . Cloud Formation connect to EFS for mounting to pod . For this it require some power that is know as role.

One more file “storage.yaml file” that will create one seprate SC ,PVC for wordpresss and MYsql. Pv will contact to this SC .

Now creating the provisioner for EFS,Role,SC ,PVC for wordpress and Mysql.


Creating one deployment for MYsql and also creating service type-ClusterIP.

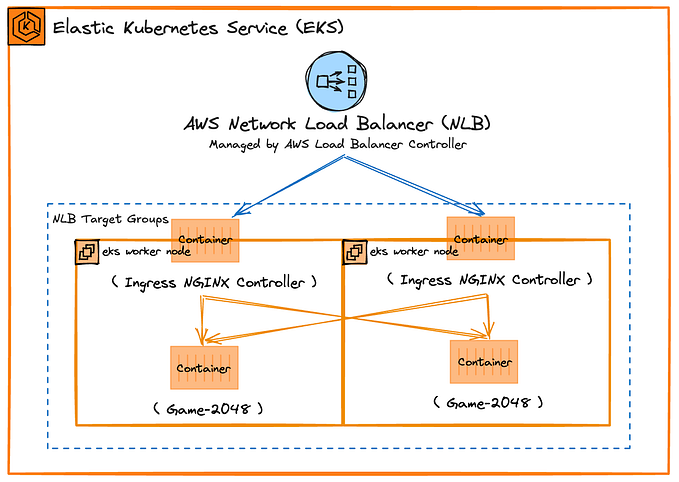
Creating one deployment for Wordpress and also creating service type-LoadBalancer.
Creating one secret box that will for wordpress and mysql env values.
then launching wordpress and mysql.

we mention service type-Load balancer for Wordpress. EKS contact to Cloud Formation and cloud Formation connect to ELB for creating one Load Balancer/Service of type-LoadBalancer.

as you can see ELB create one LoadBalancer service for wordpress. By using this DNS name we can connect to wordpress website.

To see where pods are runnning means on which nodes they are runnning.

This is the first page you will see when you connect to wordpress by using the DNS name provided by ELB.

Giving some information like username and password you want to set.


Creating one post on wordpress

So this is the site client will see.

FARGATE
ECS- Elastic Container Service
ECS is one service that is used to manage the containers.
Fargate is one subservice of ECS.
Fargate is used to create Kubernetes cluster like we create by using EKS but here in case of Fargate the cluster is serverless .
Fargate create serverless architecture.
Serverless
When kubectl(client) send request to master for launching a pod . At that time master will create one worker node with the resources required for launching a pod over it.
In case of Fargate the cluster don;t have predefined/precreated worker node like we have in EKS. It will create only when a demand from client comes up for launching a pod.
That is the reason why cluster that is created by Fargate is known as Serverless.
Now we are deleting our old cluster and create one fargate cluster.


we can also check from webui that fargate cluster is start creating

Currently this cluster is setup in singapore region-
ap-southeast-1
we can check currently cluster have how many nodes.

I am launching one pod . As soon as this request goes to master , master will create first one node after that launch pod over that node.

For seeing the output in wider format we use “ -o wide”
we can check pod are running on which node .